(Lobster Tortellini in White Wine Cream Sauce – recipe with step-by-step photos in post)
The Family, for the holidays, gave me a pasta machine. Happiness ensued.
Having rolled pasta by hand more than once, and having painfully discovered muscles I didn’t know were there, I was very pleased at the thought of whipping out a batch of noodles in a few easy minutes. Yet, having it here on hand, it took me this long to decide just what to do with it – I couldn’t break it in making any ol’ pasta dish… it had to be fancy.
Let’s face it, it’s hard to get much fancier than handmade tortellini. The lobster doesn’t hurt, either.
If it all sounds too daunting, fear not – I have step-by-step photos to help along the way!
This recipe makes two large servings.
First, the pasta. Machine not required, but recommended.
I’ve made pasta several times, now, and each with a slightly different method. With eggs, with yolks, with a little olive oil… the list goes on. This is pretty impressive, considering how simple the whole process is. For this, I used the easiest pasta recipe I know. Flour + Water. That’s it – add a pinch of salt if you like, but it really is that simple.
The dough is silky and easy to handle, rolls out well, cooks the same as egg based dough’s, and the end product is comparable in flavor. In fact, I would probably have to taste them side by side to know the difference in the end. Besides, you can’t beat the ease of two ingredients.
Feel free to use any pasta recipe you like, but here’s what I did:
3/4 cup all-purpose flour (plus extra as kneaded. See what I did there? Kneaded?)
1/4 cup whole wheat flour (or other, or more all-purpose)
1/2-3/4 cup warm water.
optional: pinch of salt
Method:
Mix flours in a bowl and create a well in the middle. (You can do this directly on your countertop as is traditional, but why risk a flood). Poor in 1/2 cup of the water and begin mixing with your fingertips. Add more water 1 TBSP at a time as needed until most of the dry flour from around the edges and bottom of the bowl have come together into one shaggy mess.
Dump the dough onto a well-floured work surface and begin kneading – pressing the dough away from you with the palm of your hand, and then folding it back onto itself and pressing it away again. Add flour as needed to keep the dough from sticking.
This may take five or ten minutes, but keep at it. If it isn’t stiff to knead and smooth to the touch, you’re not there yet. If the dough is the slightest bit sticky or tacky, add a little flour. If it’s dry and crumbly, add some more water – but not much!

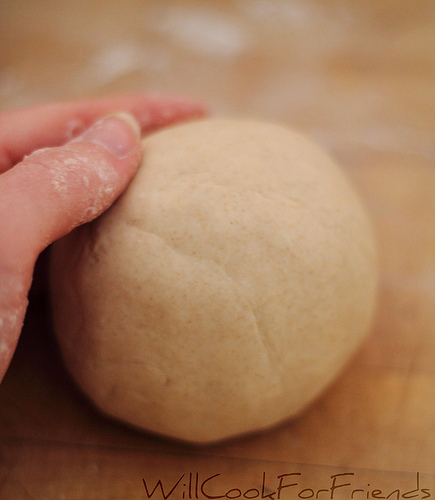
(After kneading, before resting.)
Once the dough is soft and smooth, you’re done. Form it into a ball and wrap in plastic. Let it rest for at least 1 hour, or store it in the fridge for up to a couple days. This resting period gives the glutens a chance to relax, resulting in a nice elastic dough that won’t tear. Plus, it will keep it from springing back too much every time you roll it out – trust me, it will make your life a lot easier.
While the dough is resting, let’s talk Lobster
I used one very large Maine lobster tail, but you can feel free to use a couple smaller ones. If you buy them frozen, be sure to thaw them in your fridge for a day or two ahead of time – or, if you need to speed things up, submerge them in lukewarm water until defrosted.
8-9 oz. lobster tail
1 1/2 cups water
2 TBSP unsalted butter, melted
1 TBSP lemon juice
1/4 tsp. garlic powder (I recommend powder and not whole garlic, here – fresh would overpower the lobster)
1/8th tsp. paprika
1-2 grinds fresh cracked black pepper
Method:
Using a pair of clean scissors or kitchen shears, cut along the underbelly of the tail just to either side of the legs. Peel back the legs and belly of the shell, and then cut horizontally to detach it near the base.
Using a small blade or paring knife, gently cut around the meat to help separated it from the shell. This isn’t necessary, but will make it easier to get the meat out later.
Heat 1 cup of water in a pot on the stove, or in your steamer. Once it begins to steam, set the lobster tail belly up (shell down) onto your steamer tray and lower into your steamer or pot. Cover with a lid and let steam 6-8 minutes (depending on the size of your tail) or until the shell has turned bright red all over and the meat has gone from translucent to opaque. Remove the lobster and set aside to cool.
Note: Do not discard the steaming water! Strain 1/2 cup of the lobster steaming water, and reserve for later.
While the lobster is steaming, combine butter, lemon juice, and spices in a bowl.
Once the lobster has cooled enough to handle, gently pull the meat from the shell. It should come out fairly easily.
Cut the meat in half lengthwise, or just make an incision down the back about 1/4 inch deep, to reveal the vein. It’s called a vein, but we all know what it really is, and we do NOT want it in our dish.
Using the side of your knife or your fingers, gently scrape the vein away from the meat and discard. Run the lobster under water to help rinse the vein away if necessary.
Cut/shred the cleaned lobster meat into very small pieces – no larger than 1/8th of an inch – and toss into the butter/lemon mixture.
Set aside.
Preparing the tortellini
Tortellini is a lot like ravioli, only in a smaller, cuter package. Making each one by hand may seem a little tricky at first, but once you get the hang of it things go pretty quickly.
Once your pasta is done resting, remove it from the plastic and lay it on a lightly floured surface.
Note: I suggest tearing your dough in half and working with 1 half at a time. Keep the second half wrapped in plastic so it doesn’t dry out. This will make it easier to roll and work with, and you won’t have to worry about the pasta getting too dry.
If you have a pasta machine, begin rolling it though the widest setting, folding it over itself, and passing it through again before rolling it slightly thinner and thinner.
If you don’t have a pasta machine, get out a rolling pin and prepare for a work out. This method will work fine (trust me, I’ve done it) but brace yourself to use some elbow grease.
If you’re using a machine, I suggest taking your dough to one of the lowest 1-2 settings. If you’re rolling it the old fashioned way, I’d say go as thin as you can manage.
Once your dough is as thin as you’d like it, cut it into squares or circles. I aimed for about a 1.5 – 2 inch diameter, but a little larger would be fine. I don’t suggest going any smaller.
For squares, using a guide, pasta cutter, or pizza roller work best. For circles, I enlisted the help of a round cookie cutter. These are great because they often come in sets of different sizes, so you can choose precisely the size you want.
Tortellini are made using circular cuts of pasta – cappettelli are made with squares. The process is exactly the same, so whichever you choose to use are fine. I’ll demonstrate first with the cappettelli (squares) because it’s a little easier to see what I’m doing.
Into the middle of a square (or circle) of pasta, scoop a small amount of the lobster and butter mixture – I suggest no more than 1/4-1/2 tsp. Too much filling and it will ooze out the sides which will make your pasta harder to seal and might cause it to rupture while cooking. Less is definitely more when it comes to stuffing pasta.
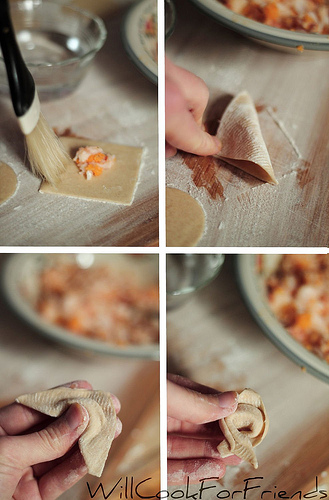
Using a pastry brush or the tip of a finger, lightly dampen the edges of the pasta. Fold the square over, connecting two opposite corners, and press the edges down to seal them. Try to press close to the filling to be sure no air pockets are inside.
Once you have a little triangle, hold it on your fingers and use your thumb to push the filling towards the top of the triangle. At the same time, bend the tips of your fingers to curl the top of the triangle forward (or use both hands, if you aren’t busy holding a camera).
At this point try to think of the two lower points of the triangle as arms. Fold the arms in front of the ‘belly’ of filling, and pinch them together.
(Alternatively, you can wrap the ‘arms’ around the tip of your pinky finger).
This is called ‘cappettelli’ – presumably because the point of the triangle makes it resemble a little hat.
Tortellini is made exactly the same way, only with circles.
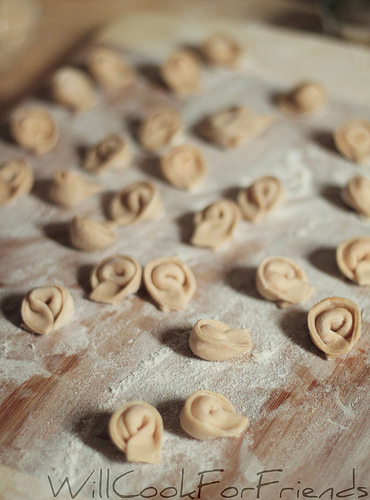
Again, this may seem like a bit of work at first, but in no time you’ll be a tortellini folding machine. Once you get the hang of it I suggest laying out 5-10 rounds of pasta, dolloping filling into each, brushing them all with water, and then folding them all at once to make speedy work of things.
Tip: Always keep your pasta on a lightly floured surface, and try not to let the tortellini touch, to prevent stickage.
At this point the pasta is ready to be cooked, or it can be tossed in a little flour or oil and stored in the freezer in a baggie or other airtight container. These are great for making ahead, and because they’re a little time consuming I highly suggest prepping them when you’ve got an afternoon free and then making them for a super fast, super fancy meal.
The sauce, and finishing the pasta
Make the sauce while bringing a pot of salted water to a boil for the tortellini.
1.5 TBSP unsalted butter
1.5 TBSP AP flour
1/2 cup of the strained and reserved lobster cooking liquid (can substitute fish stock, vegetable stock, or water)
3/4 cup white wine (I used a lightly sweet table wine, but use what you like. Not cooking wine.)
1/2 cup heavy cream
1/4 tsp. nutmeg – freshly grated if possible
2 TBSP fresh chopped parsley, plus more for garnish
Salt to taste (I used truffle salt which added a wonderful depth of flavor, but this is not necessary.)
Fresh cracked pepper to taste
Method:
In a pan over medium heat, melt the butter. Add flour, and stir to make a paste. This is a roux, and will not only thicken but help stabilize the sauce. Let it cook 1-2 minutes, stirring occasionally, or until the roux begins to bubble slightly. This will cook out the flavor of the raw flour.
Add the reserved lobster water, bring to a boil, and stir for one minute to thicken.
Add white wine, reduce heat to medium, and cook until reduced by half.
Reduce heat to low, and begin whisking. While whisking drizzle in the cream and let cook until thick enough to coat the back of a spoon.
Add nutmeg, parsley, salt and pepper. Taste and adjust seasonings.
Somewhere in there your water will have come to a boil. Add the tortellini in batches (maybe a dozen or two at a time, depending on the size of your pot) and let cook 2-3 minutes if fresh, 3-5 minutes if frozen, or until the pasta floats to the top. Using a slotted spoon or strainer, transfer pasta to a colander and repeat with remaining tortellini.
Once the sauce has thickened, add the cooked and drained tortellini, stir to coat, and serve immediately.
Garnish with extra parsley, or serve as I did with sauteed vegetables.
Don’t dim the lights on this romantic dinner for two – you might find yourself wanting to gaze at the food, rather than the company.


I love the post but a photo of the uncooked tortellini would look better on Zenspotting. It looks delicious! :)
That’s a good point – I didn’t even think about it. Thanks for the tip!
This looks absolutely fantastic!! Will definitely try it out! :) Thanks!
You’re welcome – hope you like it! I’d love to hear how it turns out. :)
Just made them tonight! Used a ricotta and parsley filling. fantastic!! thanks so much!!
Sounds fabulous!
What a perfect loved filled Valentine’s day meal! Unlike most people though, I am obsessed with lobster claw-I much prefer it to the tail and will trade a tail for 2 claws any day. I think that I would use claw in this dish as I think that they are so sweet and I love their texture much more. Do you see that as an issue or did you just use tail as its more readily accessible? I might add a touch of chili to the sauce too as I love that combo of lobster and chili. Thanks for the inspiration.
The Dinner Belle at Kimberlybelle.com
I can’t say I’m enough of a lobster connoisseur to make a huge distinction in the taste between claw and tail, but the tail was more readily available and made a nice presentation, so those were both pluses.
I never would have considered lobster and chili together, but it certainly sounds good. The filling possibilities are pretty endless when it comes to pasta, so whatever you like is what you should use. :)
Beautiful!
Thank you.
Oh My, your photo is spectacular. Lobster ravioli. What a special dinner.
~ Ann
Thanks!
Newbie question here — when you say boil a minute or so longer for frozen tortellini do you mean to pop them straight form the freezer into the boiling water or should one thaw them first? I am trying to plan an Italian meal for a few friends and this recipe of yours looks good.
Just came here from Tastespotting btw.
No, that’s a great question. I mean straight from the freezer to the pot, with no thawing – just like when you buy frozen ravioli or tortellini from the store.
Good luck, and I hope you enjoy the recipe!
Yep, I’ll be making this. My husband would loove this! I love your blog, it’s filled with so much amazing recipes! So glad I found it! Thanks for sharing all your amazingness
Wow – I’m flattered, thank you! Let me know how the recipe turns out. :D
Wow that’s what I want to taste. I will try to follow your recipe and get it done for a family gathering. I wanna know how to make it taste good with my own bare hands working it. Nice and awesome share thanks for the recipe.
You’re welcome! Let me know how it turns out, I would love to hear what you and your family think. :)
This looks delicious! Haven’t made fresh tortellini before but must try this recipe. Thanks for sharing!
You’re welcome! It’s a bit time consuming, but well worth the effort in my opinion. Hope you like it! :)
Good morning, I featured this recipe on my blog today for my weekly seafood round-up. It looks great, thanks for allowing me to share! Here is the link: http://carriesexperimentalkitchen.blogspot.com/2012/06/week-22-seafood-frenzy-friday.html
Wonderful, looks like a great roundup! Thanks for letting me know. :)
What a beatiful well written recipe! I love how descriptive you were. Also, all the photos look amazing. Can’t wait to try this.
Thank you, I hope you enjoy the recipe!