Two years ago, I shared my husband’s tried and true pumpkin pie recipe. It was the recipe he’d been making for his family’s Thanksgiving’s for years. We made that recipe again and again together, and I was so eager to share it with you all. Then the comments started rolling in: many of you made that recipe for your Thanksgiving table, and for some of you, it was a big, pumpkiny failure.
Reading those comments broke my heart. First of all, I couldn’t apologize enough for having ruined your holiday desserts. Clearly this wasn’t just a simple error one person had made, because more and more of you kept telling me the same thing: the pie never set up. The filling was too wet, and you were left with pumpkin soup, not pie. (Delicious, but really not what you were hoping for.)
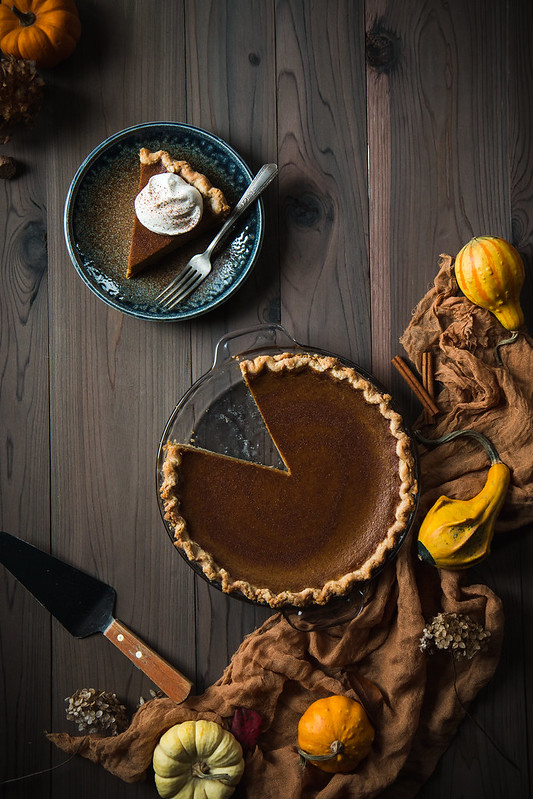
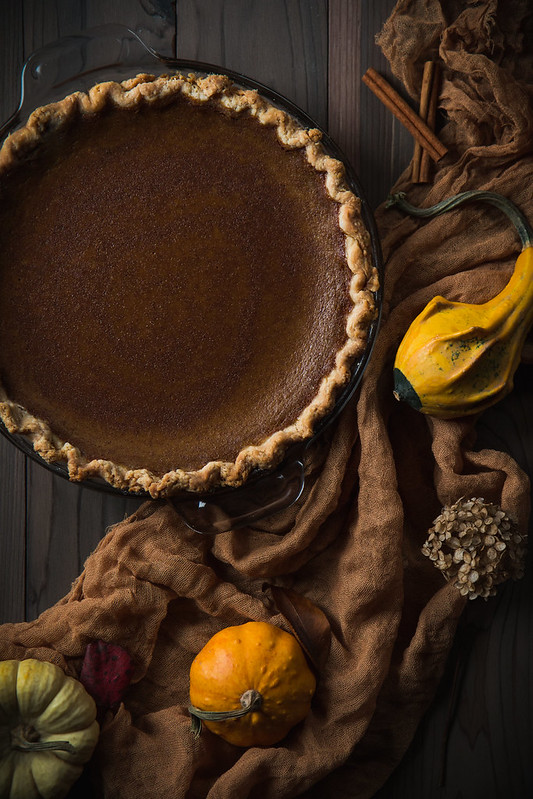
When I was done sending out my sincerest apologies, I vowed to fix that recipe, and make it absolutely foolproof. If you know me, you know that once I set my mind to something, I won’t rest until it’s done. So last year, I went on a pie making frenzy, tweaking the recipe and trying all kinds of variations. I made them at different temperatures, in different ovens (both gas and electric). I made more than a dozen pies that year, and a half dozen more this year, just to be absolutely certain that the recipe I’m sharing with you now will turn out perfectly, even if it’s your first time making it. I have full confidence in this pie, and I hope that any who had problems with it the first time around will give me a second chance. This is my family’s (new) favorite pumpkin pie, and I hope once you taste it, it will be yours too.

I’ve inlcluded a lot of notes with this recipe, not because it’s at all hard to make, but because I like to be thorough, and I want you to be armed with every piece of information you might need before you begin. If you’ve ever had trouble with making custard pies in the past, I hope that some of the information here will help answer some of your questions. (And if you have any questions that I didn’t address, feel free to leave a comment or e-mail me and I will respond as quickly as I can.) Again, this recipe is NOT difficult, I just want you to know I’m here for you if you need anything. Because that’s what friends are for.
Before we get on to the recipe, there’s something I need to get off my chest. I feel like everyone who makes pumpkin pie from scratch claims that they make “the best” pumpkin pie ever. (EVER! They are very adamant about this.) Nine times out of ten, though, the recipe they use is straight off the back of the Libby’s can. Now, there’s nothing wrong with that, mind you — there’s a reason that recipe has been a standard for so many years — but there are two things which I think can make any pumpkin pie even better. (Even if you don’t go with my recipe, I highly recommend you try these things to make whatever recipe you use extra special.)
The first is fresh (homemade) pumpkin puree, and the second is fresh (good quality) spices. Now, I know what you’re thinking, “homemade pumpkin puree? Is this woman insane?” but wait, hold that thought, because making homemade puree really isn’t difficult at all. In fact, I shared a tutorial on how to do-it-yourself in the first year of starting this blog, and to this day it is one of my most referenced posts. In my opinion, the taste of homemade puree is much sweeter and less… tinny… than the canned stuff. I like to blend up a pumpkin, then portion it into freezer bags in the amounts I’ll need. Then I label them, freeze them, and thaw them out whenever I need to. You can find my tutorial (brace yourself for my mad photography skills, or lack thereof), here: Pumpkin Puree Two Ways. (I’ve made more than twenty pumpkin pies in the past two years, all with homemade puree. You can do this.)
The second thing that makes this pie just a little extra special are the spices. I think it’s a common misconception that spices are spices are spices, so why bother seeking out a spice shop when the little red-capped bottles are so cheap and easy? The thing is, spices are not all created equal. Freshness and purity matter, and even different species of the same spice can change the flavor drastically (for instance, if you go to a dedicated spice shop, you’ll find several different types of cinnamon, all with different flavors. I like the sweet Vietnamese cinnamon, but you might prefer the spicier Chinese cinnamon, or the mellower Indonesian cinnamon). I know this sounds really nit-picky, but I swear by quality spices, no matter what I’m cooking or baking. (One thing that really convinced me was the first time I purchased paprika from Penzey’s Spice House. Until then, I was under the impression that paprika was a flavorless spice used to add color to the tops of deviled eggs. Boy was I wrong!) Penzeys is a great place to get your spices from, and if you have one local to you, you can go in and get samples of things. And, because you can buy your spices in bulk, in whatever quantity you need, it can actually be cheaper than buying big ol’ jars of spices that will only go bad sitting in the cupboard. Other spice shops are great, too, I’m just partial to Penzey’s (and no, I’m not being paid to say that). They also have an online shop, which comes in handy when the closest one to you is over an hour away.
With me, still? Good, because you’re about to make the best pumpkin pie ever. EVER. (You know, in my humble opinion.)
- For the crust:
- 1¼ cups all purpose flour (about 5.6 oz by weight)
- 1 TBSP granulated sugar
- ½ tsp. Kosher salt (or ¼ tsp. fine grain sea salt)
- 1 stick very cold unsalted butter (8 TBSP, or 4 oz. by weight -- I like to keep mine in the freezer)
- 3-5 TBSP ice cold water, as needed
- For the filling:
- 1 ¾ cups fresh pumpkin puree
- ¾ cup whole milk
- ¾ cup heavy cream
- ¾ cup turbinado sugar (or light brown sugar)
- 2 large eggs, room temperature
- 1 tsp. Pure vanilla extract
- 2 tsp. ground cinnamon
- 1 tsp. Ground ginger
- ½ tsp. ground nutmeg
- ¼ tsp. Allspice
- ⅛ tsp. cloves (optional)
- ¾ tsp. kosher salt (or about ½ tsp. fine sea salt)
- For the crust:
- In a large bowl, whisk together the flour, sugar, and salt. Cut the butter into ½ inch cubes, and add to the bowl. Using a pastry cutter (or a couple of forks or knives) cut the butter into the flour until it resembles coarse crumbs. The biggest pieces of butter should be about the size of large peas. (Alternatively, pulse together the flour, sugar, and salt in the bowl of your food processor. Add the butter and pulse until it resembles coarse crumbs, then dump into a large bowl and continue to the next step.)
- Add 3 TBSP ice cold water to the dough, and mix it around with your fingertips. The flour will still look quite dry, but that's okay. Add more water 1 tsp at a time as needed – you know the dough is wet enough when you can take a small handful, squeeze it in your fist, and it will clump together and hold its shape. It will still look very dry, and crumbly apart easily, but that's okay. Try not to add any more water than necessary.
- Squeeze the mixture into a ball, and press into a disc. It should be just barely wet enough to hold together. Wrap the disc tightly in plastic wrap, and let rest in the fridge for at least 1 hour, or up to a couple of days.
- When you're ready to bake the pie, roll out the dough. Cut two large sheets of parchment paper, and dust one sheet lightly with flour. Unwrap the disc of dough, and place it in the center of the sheet. Dust the top with a little more flour, and place the second sheet of parchment on top. Roll from the middle of the dough out to the edges, rotating as you go to create a circle. If the parchment begins to stick to the dough, peel it back to loosen it. Try to avoid adding more flour unless absolutely needed. Roll the dough to about ⅛th inch thickness, or as thin as you can. Peel away the top sheet of parchment paper, and use the bottom sheet to help lift the dough over and into the pie pan. Peel away the remaining parchment, and ease the dough into the pan without stretching or pulling it. Trim the edges so that there's a ½ inch overhang all the way around, then tuck this overhang underneath to create a raised edge. Crimp or decorate the edges however you like.
- For the filling:
- Preheat oven to 425 degrees F.
- In a large bowl, whisk together all of the filling ingredients until smooth, then pour into your prepared crust (I like to pour my filling directly into an unbaked crust, and bake the whole thing all at once. I find this works well as long as the crust is rolled thinly enough. If you prefer to pre-bake your crust (it takes a bit more time, but is a great method) I've included directions in the recipe notes below).
- Place on the center rack of the preheated oven, and bake for 12-15 minutes. Then reduce the heat to 325, and bake for another 45-60 minutes, or until the filling has started to set around the edges, but still jiggles slightly in the middle. The pie should finish setting up as it cools. (See recipe notes for more details on how to tell when the pie is done). I like to rotate my pie once during cooking, to make sure the crust browns evenly.
- Remove the pie from the oven, and let cool for at least 2-3 hours, or overnight. Once cooled, the pie is ready to be eaten, or can be chilled in the fridge if you prefer it cold. (I like to make my pies a day in advance, this way they're ready to go right when I need them.)
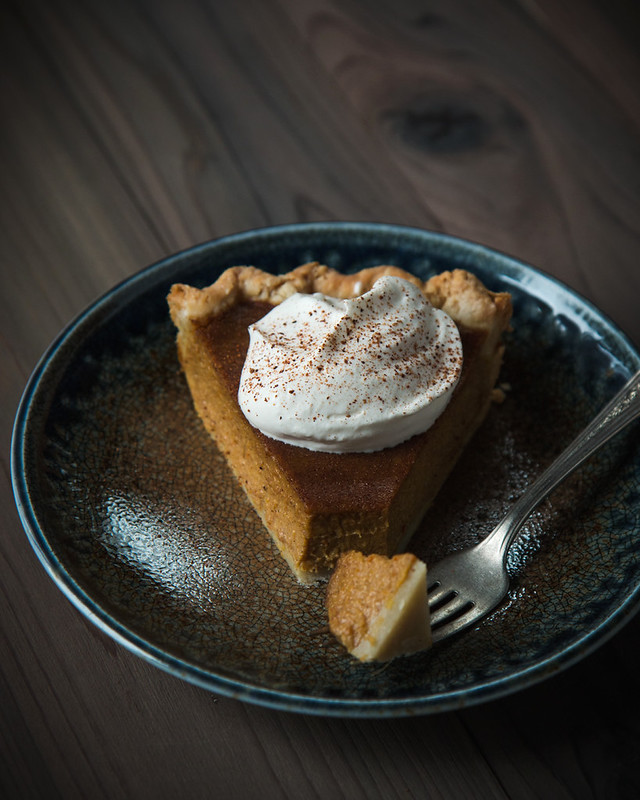
- Serve with fresh whipped cream, or ice cream, and a sprinkling of cinnamon or nutmeg for garnish. Enjoy!
2. I could write a whole post on pie crust, but I'll keep it brief here: I like to roll my crust between two sheets of parchment, this way I don't end up adding too much flour. Adding too much flour will result in a tough crust. When it comes to pumpkin pies, pre-baking the crust is a popular method to ensure the bottom gets baked all the way through and isn't gummy. I'm a pour-and-bake kind of girl (I prefer to pour my filling directly into an unbaked crust, and bake the pie all at once) and find that as long as I roll my crust thin enough, it cooks through just fine. If you prefer to pre-bake your crust, here's how: Preheat your oven to 350 degrees F.. Roll the dough as instructed and place into the pie pan. Line the crust with parchment paper (you can use one of the sheets from rolling the dough), then fill with pie weights or dried beans. Bake for 20-25 minutes, then carefully remove the parchment and weights. Return the crust to the oven and bake for another 5-7 minutes, or until the crust is a pale golden color. Let cool before adding the filling. (If using a pre-baked crust, add the filling and bake the pie at 325 for 60-70 minutes.)
3. Knowing when the pie is done is probably the single hardest part of making a pumpkin pie. Because it is a custard, the filling will still jiggle when the pie is ready to be pulled from the oven, but will set up as it cools. There is a subtle change that happens towards the end of baking, and you have to know what to look for to see it. The best description I've heard is "the center of the pie should jiggle like jello, not wiggle like a wave." The filling should be firmer around the edges, but still jiggle in the center when the pie pan is gently moved. If you aren't confident the pie is done just from looking at it, there are a couple of "poke" methods to test it: an instant-read thermometer inserted into the center of the pie (not all the way to the crust, just to the middle of the filling) should read about 175 degrees F., and a thin knife inserted halfway between the outer edge and the center of the pie should come out mostly clean. If the pie is overdone, it may crack or split, or the filling might start to pull away from the edges of the crust. If the filling begins to puff or "souffle" up, it is a sign the pie has been cooked too long, or the oven temperature is too high (I suggest using an oven thermometer to make sure the dial is accurate). If you notice any of these things, remove the pie from the oven immediately. Pies that have been very overcooked can sometimes "weep", and be very liquidy once cut into. If this is the case, start over and reduce the cooking time. (If your pie does crack, or you're left with a hole from checking the temperature or inserting a knife to test doneness, go ahead and cover those up with a big dollop of whipped cream before serving. No one has to know!)
4. If you're baking your pies the day you plan to serve them, it can be helpful to make the dough and filling a day in advance. The dough can be kept in the fridge, or can be pre-baked and left out at room temperature overnight. The filling can be mixed and kept in an airtight container in the fridge overnight (just be sure to give it a stir before you pour it into the crust). Keep in mind that if your filling is cold, the pie will take longer to cook. Refer to the notes above on how to tell when the pie is done.
5. For instructions on how to make your own pumpkin puree, go to: www.willcookforfriends.com/2011/10/pumpkin-puree-two-ways-and-neither-are-from-a-can.html


You’re right. This recipe is thorough. I’m ready for a slice of pie–this pie. In my face, all of it.
Heheh, what can I say, I learned a lot in two years of making pumpkin pies, and had to share. :)
Yummy pumpkin pie..tasting for the first time.Fell in love seeing in pinterest.Really tasty put one tbs of pumpkin spice instead of other spices. Pumpkin spice made from another pinterest post.
A BIG THANK YOU TO YOU
Haha, and a big YOU’RE WELCOME to you! I’m so glad you liked it!
What a gorgeous pie! And it looks so dark and rich. Thank you for a lovely recipe!
You should add the Pecan Streusel Topping recipe on this updated pie page. ?
Hi, I came across this recipe back in 2020? And i have been making it every year since! I LOVE the spice flavor to this. It elevates it from pumpkin pie to ✨ Pumpkin Pie ✨ . I have made it exactly like the recipe and i have made it and added canided pecans on top! This pie is the perfect pie to have on its own or to add a little extra sweetness. Its the perfect balance! So thank you for your new and improved family recipe that has now become my family’s recipe . I will never make a pumpkin pie any other way!