 |
| Hot Cocoa Mix with Peppermint Marshmallows – recipes in post |
There’s nothing like coming in from the snow to wrap your mitton’d hands around a warm mug of hot cocoa. Just one sip can transform an unpleasant chill into the most wonderful feeling of renewal, melting away the cold, melting away the world.
It’s hard not to romanticize it with memories of my childhood… except, when I was a kid, hot cocoa meant swirling Ovaltine into a glass of milk and microwaving. Not so romantic, huh. Fortunately, I’ve grown up since then.
The best part of making your own cocoa mix is that it can be made to taste. We like to use dark chocolate, but if you prefer you can use milk, or even white. The amount of sugar can be increased or decreased, and any number of spices or flavorings can be added in. I’ve included some of these variations in the recipe notes. I stuck to the classics for my hot cocoa, to pair with the peppermint marshmallow snowflakes. These marshmallows have just as many flavor variations as the cocoa itself, so if you’re not a fan of peppermint, don’t worry!
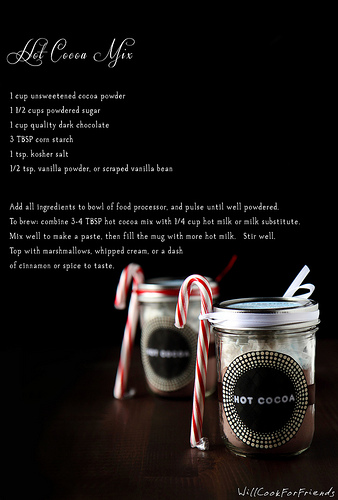
Packaged in jars and tied with a candy-cane for stirring, these make a perfect gift around the holidays. I like to leave these on the doorsteps of neighbors, or with a note in the mailbox for the delivery guy, because let’s face it… who doesn’t love chocolate?
Homemade Hot Cocoa Mix
Makes approx. 5-6 cups cocoa mix
1 cup unsweetened cocoa powder
1 1/2 cups powdered sugar (plus or minus a few TBSP to taste)
1 cup quality dark chocolate (use what you like)
3 TBSP corn starch
1 tsp. kosher salt
1/2 tsp. vanilla powder, or scraped vanilla bean (optional)
Method
Add all ingredients to the bowl of your food processor, and pulse until smooth and well-powdered. Store mix in an airtight container in a cool dark place (or the fridge) for up to several months, or freeze indefinitely.
To Brew: In the bottom of a mug, combine 3-4 TBSP cocoa mix with 1/4 cup hot milk, or milk substitute. Mix well to make a smooth paste, then fill the mug with more hot milk or substitute. Stir well, and top with marshmallows, whipped cream, or a dash of cinnamon or spice to taste.
Recipe Notes: There are endless variations possible when it comes to your cocoa mix. We like to use a darker chocolate (somewhere around 60-65%), but you can use milk, or white, or whatever you like. Feel free to play up the flavors with spices like cinnamon, nutmeg, or cayenne for Mexican hot cocoa… add a little espresso powder for a pick me up… or try orange zest, chai spice, cloves… the list goes on and on!
Peppermint Marshmallows
3 packages unflavored gelatin powder (such as Knox – approx. 2.5 TBSP total)
1 1/2 cups granulated sugar
1 cup light corn syrup
1 cup ice cold water, separated
1/4 tsp. kosher salt
1 tsp. vanilla extract
1/8th-1/4 tsp. peppermint extract*
For Dusting:
1/2 cup cornstarch, plus more as needed
1/2 cup powdered sugar, plus more as needed
Food coloring (I use gel colors) and luster dust, optional
*A little goes a long way! 1/8th tsp. is merely 2-3 drops, and is what I use. I suggest starting with this, and adding more to taste if you like.
Method
1. before you begin, prepare your work surface. Clear some counter space, and sift together the cornstarch and powdered sugar. Lightly grease (or spray with cooking spray) a rimmed baking sheet, and dust generously with the cornstarch/sugar mixture. It should look like a winter wonderland with no gaps in the snow – be sure to get the edges and sides of the pan as well. (I like to lay parchment paper over my counter before I dust the pan, that way I can funnel any excess back into my bowl to re-use later.) You’ll also want to grease and dust a flexible rubber spatula. Set aside.
2. In a large metal bowl, or the bowl of your stand mixer, add the gelatin and 1/2 cup of the cold water. Set this aside while you prepare your sugar mixture.
3. Add the granulated sugar to a medium-sized pot with a lid. On top of the sugar, add the corn syrup, salt, and the rest of the water. Turn the heat to medium-high, cover, and let cook 3-4 minutes.
4. Once the sugar has cooked for a few minutes, remove the lid and clip on a candy thermometer. Let the mixture boil until it reaches 240f. – do not stir, just let it bubble away. This may take 5-10 minutes, but watch it closely. As soon as the sugar reaches temp., remove it from the heat and proceed to the next step.
5. Using a hand or stand mixer, begin beating the gelatin/water mixture. Slowly pour the hot sugar mixture down the side of the bowl while mixing – try to avoid letting the liquid fall directly onto the beaters, as it may spatter. If you’re using a hand-mixer, a second set of hands might be
6. Once all the sugar mixture is poured, increase the speed of your mixer to high and beat for 12-15 minutes. After the first 5 minutes it will begin to take form and look like marshmallow fluff, but don’t stop there. If you’re using a hand-mixer you will notice a significant increase in resistance against the beaters (also, if using a hand-mixer, you may notice the fluff climbing high up the beaters – dip the beaters up and down slightly while you whip to prevent the sugar from engulfing your mixer!). Beat until the side of the bowl is just warmer than room temperature. In the last minute or two of whipping, add in the extracts (or any other flavorings you choose). If you’d like to make your marshmallows a solid color, add the food coloring now.
7. Use your spatula to turn the fluff out onto your prepared baking sheet. Smooth the top as evenly and quickly as you can, but don’t worry, it doesn’t have to be perfect. For the food coloring swirls, I used Wilton Gel color and the tip of a thin knife to swirl the color throughout. Let the marshmallow sheet sit at room temperature a minimum of 4 hours, or overnight.
8. Once the marshmallows are set, dust the top with more of the cornstarch/powdered sugar mixture (and a little luster dust if you like – I used silver to create a sparkling snow effect). Using a sharp knife dusted with powdered sugar, cut the marshmallows into cubes (or, dust a cookie cutter and make shapes like I did). Dust each marshmallow thoroughly to keep them from sticking. Shake or sift off any excess powder, and let the marshmallows dry for another hour or two.
9. Once done, marshmallows can be stored in an airtight container in a cool dry place for up to a couple weeks.
Recipe Notes: To make regular vanilla marshmallows, leave out the peppermint extract and add a splash more vanilla.
Marshmallows are incredibly versatile, and other flavor options include spices like cinnamon, nutmeg, pumpkin pie spice… any flavor extracts you like, or even a splash of flavored liquor like Bailey’s Irish Cream or Schnapps .. cocoa powder and/or melted chocolate… fresh fruit or jams… the list goes on and on.


What a sweet gift, I really like this idea and the candy cane added for a stirrer is perfect.
So cute, what a great idea!
So very cool. Love it!
Great gift idea!
Willow, your writing, photography and creative recipe skills have become extraordinary! When is the book being published?!? Simply outstanding.
Thanks, Kirk – you flatterer, you!
your marshmallows are so pretty! And as far as i’m concerned, those little things can be so tricky. What a great gift idea; i had zero luck making my own marshmallows this year, but you make me want to give them another whirl.
The hardest part for me is spreading the fluff out since it’s so sticky… but if taste is what matters, I think mine are pretty good. I like the peppermint for the holidays, but my favorite is still the vanilla (of all the flavors I’ve tried, including chocolate, cinnamon, and chai). So classic!
Those marshmallows are absolutely adorable! I love that little colored swirl.
After looking over a handful of the blog articles on your web page, I seriously appreciate your technique of writing a blog.
I saved it to my bookmark webpage list and will be checking back soon.
Please visit my web site as well and tell me what you think.
Look at my homepage the With Us In Need Of Our Medication The Pharmacy Had It Delivered To Us
I am planning to do this for christmas gifts this year! This seems like a really yummy and quality mix!! Where did you find the “labels” or did you make them yourself? I want to copy everything!! Thanks for sharing!
Hi Meesh –
I made the labels myself. I’m afraid I don’t have the files that I used anymore, but it wasn’t terribly difficult… I did the text and patterns in photoshop (you could use whatever editing program you have available), and then uploaded them onto a template which came with the printable stickers (I like to use Avery stickers, as they seem to print and adhere well). Using the template that comes with the stickers makes it fairly easy to adjust the size and have everything come out how you want it. Hope that helps!